

What is Plastering Process
Plastering is present all around us; there are various types of plastering, with each of them has different mixing techniques and applications. Hence, it is essential to be able to identify which type is best suitable for your project. This step-by-step guide will give you detailed information on how to perform the Plastering process.
Plastering in construction is the process of covering masonry/blockwork walls in the construction of houses and other structures with a mixture of cement and sand along with the required quantity of water. The requirement of the good mortar are as follows:
It should be adhered to during climatic changes and to the background.
It should be economical.
It should be hard and durable.
Plastering should be made used in all weather conditions.
It should effectively avoid penetration of moisture from the outer surfaces to the internal block/structure.
It should possess good workability.
Type of Plastering:
Internal Plastering
External Plastering
Internal Plastering
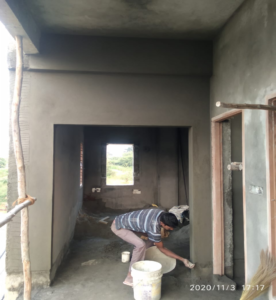
Internal plastering means plastering done for internal walls in which the work procedure provides a finished surface that is firm and smooth. The plaster acts as a thermal insulating layer to an extent. It acts as a layer for fire protection.
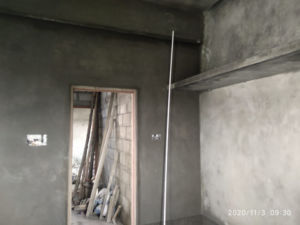
Fig: Internal Plastering
Preparation of Surface for Internal Plastering
The mortar joints of the wall are kept rough to give a good bonding to hold plaster.
Excess amount of mortar should be removed after blockwork masonry/blockwork, and pointing is to be done for all the joints.
Finishing of mortar joints in blockwork/masonry, be it stone or brick, is called pointing.
Clean all the surfaces and joints of the wall with a wire brush; there should be no grease or oil etc., left on the wall surface.
If there are any holes or cavities on the surface, fill it in advance with concrete and dry for at least a day.
Plaster the entire wall and wash the mortar joints, and keep it wet for at least 6 hours before applying cement plaster.
To reduce the consumption of mortar, if the projection on the wall surface is more than 12 mm, then knock it off to obtain a uniform surface of the wall.
Hacking must be made on all concrete surfaces such as columns, beams, ceiling, and retaining wall before plastering to ensure proper bonding between mortar and surface.
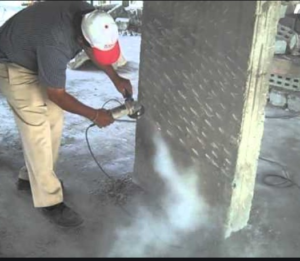
Fig: Hacking of Column
Ensure all the electrical conducting work is complete.
Cover groove cutting by chicken mesh to avoid cracks developed by groves in the future.

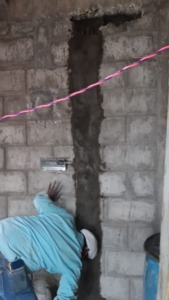
Fig: Applying Chicken mesh to electrical conduit groves and plastering them to avoid cracks in the wall
BULLMARK PROCEDURE:
What is BULLMARK? Should it be done for both internal walls and external walls?
BULLMARK is a patch of plaster of size 12-15mm thick and having a thickness of about 10cmx10cm. Placed on the one-end corner of the wall to be plastered to get the uniform thickness of plastering throughout the wall surface.
Yes, Bull marks are essential for getting smooth and even surface throughout, so this is essential for both internal and external walls while plastering.
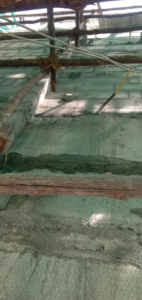
Fig: Bull Mark
First, fix the Bull mark on the wall. Bull mark A is marked on one corner.
About bull mark A, another bull mark is fixed on the wall first horizontally and then vertically at a distance of about two meters, covering the entire wall surface.
Check the verticality of the bull mark, one over the other, using a plumb-bob.
After fixing the bull mark, the vertical strips of plaster, known as screeds, are formed between the bull mark. To maintain even thickness of plastering screeds are used as gauges.
We have to keep a plan for the bull mark to confirm the thickness of the plastering before even casting, and later that can be used as a reference.
If we identify thickness varies more than one inch, then we can propose double plastering in the plan itself.

Fig: Bull mark Checking and verifying using the drawing
The perpendicularity of the two walls must be checked, and the thickness of the bull mark must be adjusted. Generally, line Dori are placed in right angles (3-4-5 rule) and bull thickness is adjusted on the wall, and the same thickness is adjusted to the entire wall.
If walls are not perpendicular, a good tiles pattern cannot be achieved after flooring.
Proper tile pattern achieved with perfectly 90-degree wall

Pattern not being achieved due to deviated wall and plastering.
PLASTERING OF INTERNAL WALLS:
In the case of brick masonry/blockwork, the thickness of plaster is generally 12 mm, and in the case of concrete masonry/blockwork, this thickness varies from 9 to 15 mm.
The ratio of cement and sand for plaster varies from 1:3 to 1:6.
Engineers should closely monitor the mortar mix ratio on-site.
The only required amount of dry mortar (cement-sand mixture) is prepared.
The supervisor should ensure that water is mixed to dry mortar for the quantity of dry mortar used or consumed within 30 min.
Apply plaster between the spaces formed by the screeds on the wall surface, using the trowel.

Fig: Trowel
Level the surface using flat wooden floats and straight wooden edges.
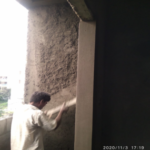
Fig: Leveling
- After leveling, let the plaster set before curing.
External Plastering
External plastering means plastering done for external walls in which work procedure is a layer of cement-sand mortar, applied over the masonry/blockwork, which also acts as a damp-proof coat over the masonry/blockwork, and the surface finishing will be rough.

Fig: External Plastering
PREPARATION FOR EXTERNAL PLASTERING:
Before starting external plaster, ensure that masonry/blockwork is complete in all respects.
Make scaffolding in advance where the plaster is to be done.

Fig: Scaffolding
Scaffolding is a temporary platform used to elevate support workers and materials during the construction; it consists of one or more platforms of proper length and size, with various support methods, depending on the structure and usage. There are two types of scaffolding:
Single Scaffolding
A sequence of vertical segments made of bamboo or Timber is planted firmly into the ground parallel to the wall under construction. The bamboo or Timber are placed at about 2 to 2.5 meters intervals and 1.2 meters from the wall.
Longitudinal horizontal components called ledgers connect the standards at vertical intervals of about 1.2 to 1.5 meters. Ledgers are typically tied with standards at every 4 to 5 feet rise using rope lashing, and another end is fitted into a hole made in masonry/blockwork wall.
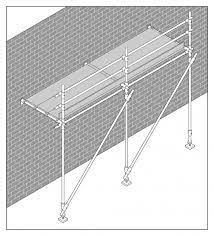
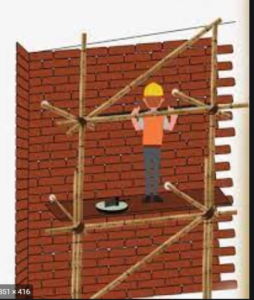
Fig. Pictorial representation of Single scaffolding
Double Scaffolding
Double scaffolding has two rows of standards and is usually separated by ledgers for better support than the single scaffolding, which contains a single row of standards.
Double scaffolding features two rows of standards. The first row is fixed near the wall, while the second row is fixed slightly farther from the wall at about 1.5 meters from the first row. The first row of standards is placed about 20 to 30 cm away from the wall. To make the scaffolding stronger and more durable, transoms are placed on the ledgers along with cross braces.no holes are made in masonry/blockwork walls.

Fig: Pictorial representation of Double Scaffolding
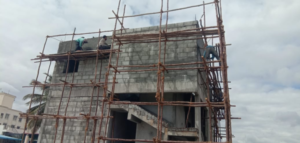
Fig: we using Double Scaffolding

Fig: Scaffolding is away from wall no holes are made in Double Scaffolding
Compared to single scaffolding, double scaffolding is preferable because it is strong and durable, and there is mainly no need for carving holes in structures/walls to support scaffolding.
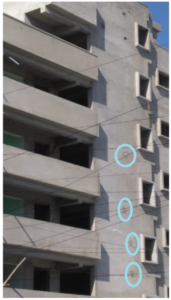

Fig: single scaffolding holes are filled and plastered but the hole marks are clearly visible even after proper plastering
If the holes are made during single scaffolding, holes should first fill them with concrete; then, the chicken mesh should be provided before plastering.
Fill the external side gaps in masonry/blockwork and joints of the beam and wall, which was impossible from outside earlier without scaffolding.
All internal plumbing lines have to be packed with concrete and finished, which are projected out.

Fig: Holes made to project plumbing lines

Fig: Projected Plumbing pipes before plastering
After the plumbing pipes are projected, the holes from the internal side are concealed using concrete and waterproofing chemicals such as GP2, and water leakage is ensured.
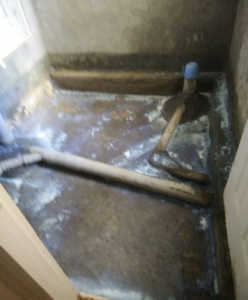


Fig: Plumbing pipes are concealed using concrete and waterproofing chemicals (GP2)
Water leakage testing (water ponding and testing) should be made before starting plastering work to avoid breaking of finished plastering later if the water leakage problem arises.

Fig: Water leakage test by water ponding before plastering
After plastering, we can install plumbing pipes easily without damaging external plastering.

Fig: Plumbing connection fittings out from the wall without damage
Remove all wooden pieces, papers, kathya (rope), etc., and other unwanted material from the R.C.C and masonry/blockwork surfaces.
Wet the surfaces a day before plastering.
Make sure to check the top level of the parapet walls before plastering.
Check all the doors, window frames for level, plumb, and line. In case of any defects, necessary corrections are done before the start of plastering.
Check all the elevation features as per the architectural drawing.
Mark level dots (Bullmark) before starting the external plaster
If the R.C.C surfaces are affected by efflorescence or green algae, clean the surface with a wire brush.
Put Dori from top slab to bottom level for all corners of the walls, corners of windows, a line of elevation features, line of R.C.C. grill, and all straight lines in that portion.
Plastering work on the outside always starts from the top of the building and is finished at the bottom.
PLASTERING OF EXTERNAL WALL:
All the joints and surfaces should be well cleaned with a wire brush and ensure that they are free from oil, grease, etc.
For fixing chicken mesh to all joints of blockwork/Masonry and R.C.C work, make a hole on the beam, wall and column with a drilling machine.
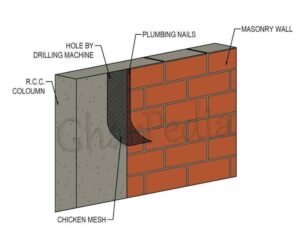
Choose the 24 gauges for external plaster and chicken mesh of 12 mm mesh.

Fig: Chicken mesh applied in-between column beam and blockwork to avoid cracks development due to less bonding and mesh to be applied where we do double plastering for areas with bull more than 15 to 20mm
Cut the chicken mesh in a minimum of 20 cm to 23 cm width by a cutter.
Fix the chicken mesh on the joint of R.C.C and masonry/blockwork wall by plumbing nails on R.C.C member and wire nails on masonry/blockwork member.
The chicken mesh should be tight enough in both directions, vertical and horizontal.
To avoid buckling and loosening of chicken mesh, which may then come out of the plaster, the spacing of nails should be less than 9” (23 cm).
The external wall will align and fix level pegs on outer wall surfaces using the surveying instrument/center plumb bobs.
Fix line Dori (string) from top slab to bottom level for all corners of the walls, corners of windows, lines of elevation features, lines of R.C.C grill, and all straight lines in that portion.
After the leveling of walls is completed, the projected surface, which is out of plaster due to an uneven surface, will be cleared.
Plastering coat mortar filling (1:4 Cement and Sand) from 15mm up to 20 mm will be applied on surfaces.
A rough surface is used to finish the external wall plaster.
Groves are made in between the beam and column, and block work for outside to avoid cracks.

Fig: Groves provided externally in-between beams, columns, and blockwork
All the openings, such as windows and door openings, must be aligned for perpendicularity. Dimensions must be checked for a clear opening as per requirements to avoid gaps issued after installations.

Safety grills showing gaps after installation due to improper levels

Proper level finished plastering showing better finish for installing grills frames
Chajja provides coping to avoid water entering through walls.

Fig: Chajja Coping
For projected slabs, we provide groves to restrain water.

Fig: Projected Slab Grove
- <li “>
Let the plaster set before applying the primer.
CURING OF PLASTER:
After completion of the plasterwork, a minimum of 3 times for 7 days curing is necessary.
Two types of curing:
Pipe curing:
The curing of plaster is made using pipe water
Manual curing:
The curing of plaster is made manually by hand using a bucket and mug.
Lime Plastering
The plastering is made using lime; the mix is typically three parts lime putty to 1 cement.
Often applied 2-5mm thick, it is the thinnest of 3. The setting coat is applied in two very thin layers and is laid down once the previous coat is beginning to steady up.
The surface is worked over using a wooden or sponge float to achieve an open-textured finish or a trowel to achieve a smooth flat finish.
These methods are used rarely these days as a high level of craftsmanship is required to do this job and may result in the undulation of the wall.
Several coats of Wall putty are widely used before painting to make the plaster surface nice, smooth, and free from undulations.
Wall putty is an easy process, as it is less time-consuming than lime plastering. We can use the sandpaper after the wall putty and get a very smooth surface.
The advanced painting will compulsorily need wall putty, and hence lime plastering is not practiced nowadays.
Quality of good P-sand based on Slit value:
Procedure for the Test
Firstly, a 50ml solution of 1% salt and water is prepared in the measuring cylinder. Adding salt will extend the settlement time of the silt.
The sample of sand is tested then added to the existing cylinder until it reaches a level of 100ml.
50ml of water and salt solution is again added to the measuring cylinder.
Please close the open end of the measuring cylinder and shake it well.
After 3-4 hours, you will notice a layer of silt settled over the sand.
Volume V1 of the silt layer settled over the sand is noted.
Further, Volume V2 of the settled sand is noted.
To get the average, repeat the procedure a couple more times.

Fig: Measurement jar
% of Silt Content = (V1/V2) x 100
V1 – Volume of silt layer
V2 – Volume of sand layer
The sand sample can be used for construction purposes when it has a permissible value of silt content in P Sand is 8%.
Different processes of plastering:
Dry Plastering:
In the dry plastering process, the plastering wall will be wetted using water or cement slurry.
Then dry mortar with minimum amounts of water in place and level using a leveling tool.
Another patchwork is also made using dry mortar.
The finishing will be good and smooth, but the strength of the plastering is less compared to the wet mix as cement doesn’t get the proper amount of water.
Hindi/North masons usually follow this method.
Wet plastering:
In wet plastering, the plastering wall will be wetted using water or cement slurry.
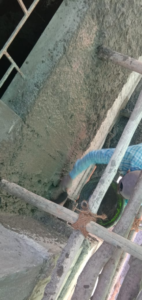
Fig: Applying Cement Slurry
Then wet mortar with a good amount of water is placed and leveled using a leveling tool.


Fig: Applying Wet Mortar/Muddy to wall
Another patchwork is also made using wet mortar.
The finishing will be average compared to dry plastering, but we can provide nice and smooth finishing with good craftsmanship.
The strength of the plaster is more compared to dry plastering.
This method is usually followed by south(Kannada, Tamil) masons.
Even though finishing dry plastering will be better and easier, hardness obtained after curing will be lesser than wet plastering.
What is the maximum and minimum thickness of plastering for the external, internal wall? What to do if it is more than desired thickness?
6mm – 12mm thick cement plaster is used for ceiling and concrete plastering.
12 mm to 15mm thick cement plaster is used for internal wall plastering and the plane surface of a brick wall.
15 mm or 20 mm thick cement plaster used for external wall plastering and rough surface of a brick wall.
Plaster is bound to shrink and crack if the thickness of mortar exceeds 25mm. In such cases, double plastering is to be followed; where plastering is done in two layers, chicken wire mesh could achieve more bonding.
If the white set plaster is too thick it would become too hard to finish off.
Conclusion:
Plastering is a crucial process for any of your dream projects. Finalizing the right process can be tedious; hence, getting the right construction partner is important. At Samruddhi, we have just the right tools and manpower with the right skills and experience. Contact today for all your construction-related queries and needs.
🤩