Anti-termite Treatment process for your Home Constriction project
We love our homes. Who doesn’t? After all, we don’t build houses every day. While constructing our dream abodes, we ensure the suitable material, the right technologies, the right professionals, and everything we think and know. We even take care of the building years after with the right quality paint and whatnot.
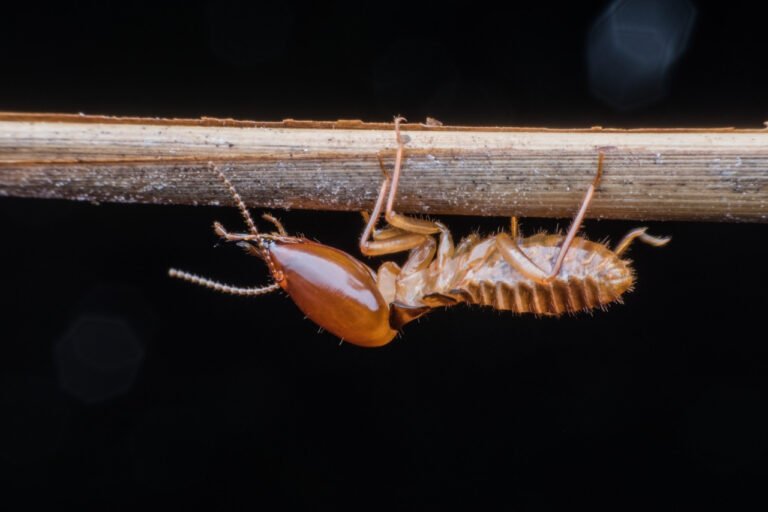
But often, we fail even to recognize a hidden enemy that can potentially ruin not only our experience but also can cause severe damage to our home’s structure. That enemy is Termite. In this blog, we will discuss Termites, their effects, and most importantly, the role of anti-termite treatment in construction works.

As per the industry, anti-termite treatment is a process to avoid termite entry into the structures by creating a chemical barrier. Termites create pores in structures like soil, wood, masonry, electrical fixtures, interior design elements. Anti-termite treatment plays a significant role in the construction process. Termites can increase the pH level, water content, and porosity in the soil. It should be treated chemically before the construction of any building as they are very harmful to human-made structures.
A soil-test report can tell a great deal about the chemical nature of the soil and about the possibilities of termite infestation. The anti-termite treatment facilitates protecting the building with a chemical barrier against the sub-soil or wood-nesting termites before and after the construction.
When can it be done?
The treatment can be executed both before the construction starts and after it completes and people start living inside the building. The success rate of the treatment and the level of effort that goes into vary according to when it was done.
Pre-Construction Treatment
If you have a plan for anti-termite treatment before the construction of your house or any building, you need to know the following notes.
This treatment should not be done when it is raining or when there is moisture in the soil.
The treatment must be carried out by an approved specialized agency for termite-prone areas.
The site Preparation process for the treatment
Remove all the trees, stumps, logs, or roots present at the building site, which may nourish the termites.
The surface with clays and with heavy soil should be scarified to a depth of 75mm at least so that penetration of chemical treatment can occur intensely.
If the soil is sandy or porous where the loss of treating solution is more, preliminary moistening should be carried out to fill the capillary spaces.
Remove all the wood-related equipment and material such as frameworks, levelling pegs, timber offcuts, or other construction debris from the area.
The treatment should be completed in flooring, levelling, and grading to ensure that they are free from organic waste and should be well compacted.
Anti-Termite Chemicals
The chemicals used for anti-termite treatment in the buildings are:
Chlorpyrifos 20 EC
Lindane 20 EC
These chemicals are used in water emulsion for the anti-termite treatment of soil to protect the building from a termite attack. If the treatment is for wood, then a kerosene-based solution of the chemicals with 1.0% concentration is used.
Dosage of the chemicals required for the treatment:
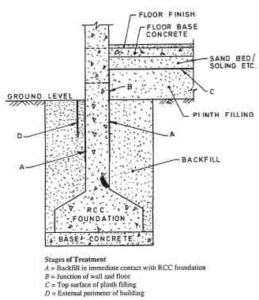
For the treatment of the RCC Foundation, it is necessary to start the treatment at 500 mm below ground level.
The soil coming in immediate contact with RCC should be treated with 7.5 liters/m2 chemical.
Before laying sand bed or subgrade, the soil shall be treated with 5 liters/m2 chemical.
If the surface is hard, compacted, and not allowing penetration of the chemical emulsion, it can be loosened by making holes up to 50 mm to 75 mm deep at 150 mm, both ways. It may be made with a 12 mm diameter steel rod to facilitate soil saturation with chemicals.
After the completion of the building, holes should be rodded at intervals of 150mm to a depth of 300mm along the external perimeter of the building. The chemical emulsion is poured along the wall at 7.5 liters/m2 of the vertical surfaces.
If the earth filling is more than 300 mm, then the extension of the external perimeter should be carried out to the full depth of filling down to ensure continuity of the chemical barrier.
The treatment procedures are different for pre-construction and post-construction.
Pre-construction Anti-Termite Treatment
Procedure:
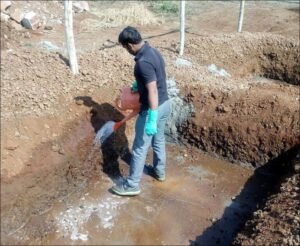
Treat the sides, and the bottom surface of the excavation trenches and pits with the anti-termite chemical before the foundation work to the height of about 30 cm with 5 liters/m2 of surface area.
The surface should be cleaned from wooden and any other garbage particles for flooring.
The soil surface should be levelled and compacted to the required elevation.
Holes with a height of 30 cm should be made at an interval of 15 cm.
The emulsion should be prepared with the correct concentration by adding water to the chemical as per the manufacturer’s specification.
This emulsion should be sprayed on the surface using pressure pumps and sprayers, poured into the holes using pouring jars.
Allow the chemical to be soaked through the holes fully.
You can have the following benefits if you conduct the Anti-Termite Treatment process at the Pre-Construction stage.
Less Expensive
Since the steps involved in Pre-construction treatment are lesser than post-construction, hence the cost of anti-termite treatment is cheap.
Fewer Obstacles
The number of obstacles required for Pre-construction anti-termite treatment is lesser.
Prevention is Better than Cure
Pre-construction anti-termite treatment can prevent termites from invasion in buildings or homes. Here the soil under the foundation is treated with chemicals to create a barrier between ground and brickwork. If this is not done, termites can access the building and generate destruction to the foundation, building walls, or the wooden attachments in the home.
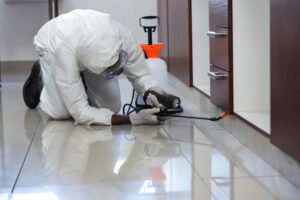
Steps involved in Post-Construction Anti-Termite Treatment:

1.Inspection
A thorough inspection of the infestation should be made in the building before any treatment to determine the extent of the spread, the routes of termite entry into the building, and damage in the area(if any).
Extermination of Termites in Building
Inspecting the infestation can identify the location of termites. The building should be completely inspected to locate termite infestation in places such as ceilings, behind wooden panels, inside electrical wiring areas, conduits, switchboards, and other similar locations.
After the above two steps, the post-construction treatment goes as follows:
The purpose of soil treatment is to establish a chemical barrier between the termites in the soil and the building to be protected so that termites cannot enter the structures.
When the retaining wall of the basements comes up, the surface in contact with the building’s external wall should be treated with the chemical emulsion at the rate of 7.5 liters/m2 of the vertical surface of the substructure and to a depth of 300 mm.
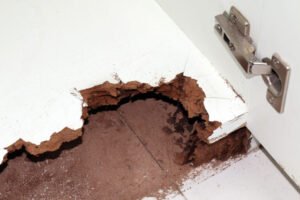
The termites find their way to the building floor through the cracks or voids in the following regions –
- At the junction of walls and floor as a result of shrinkage of concrete.
- At the cracks formed on the floor surface due to construction defects.
- Construction joints and expansion joints in a concrete floor.
Whenever the cracks are noticed, chemical treatment must be done in the building area of the ground floor. The 12 mm holes should be drilled vertically at the junction of floor and walls, constructional and expansion joints mentioned above at 300 mm intervals to reach the soil below.
Chemical treatment for wood is done at the point of contact of the woodwork and on all contact points, where wood directly touches the ground.
This treatment is done by spraying at the points of contact with the adjoining masonry with the chemical emulsion by drilling 6mm holes at a downward angle of about 45° in the junction of woodwork and masonry.
Internal parts of Electrical fixtures such as switch boxes in the wall can be treated by removing the outer coverings with 5 per cent Malathion dusting powder.

Advantages of Anti-Termite Treatment
Anti-treatment provides immediate protection to any structure from termites, rodents, and pests.
Liquid termiticide lasts for several years.
It eliminates the problem of gap formation in the protection barrier, that allows termites to enter the home.
They are relatively inexpensive when compared to other forms of termite control.
Disadvantages of Anti-Termite Treatment
It can lead to water contamination in areas close to waterways or wetlands.
Anti-termite treatment requires drilling into the areas that show the evidence of termites, which can reduce the strength of the member or structure.
A left-out portion or any minor negligence leads to problems with an infestation in the future.
Conclusion:
The anti-termite treatment protects the structures like soil, wood, masonry, and electrical fixtures from termites’ harmful activities. Proper treatment at the right time gives a good result. Though many construction firms recommend doing the anti-termite treatment at the pre-construction stage, the actual results are not promising. The effectiveness of the treatment mostly lasts for about a year.
Thus, initially, it may protect the building for a while, but follow-ups are a necessity. Everyone must have a thorough discussion with their contractor about the efficacy and requirement of the anti-termite treatment. Some modifications can be arranged at the time of construction that may or may not help during future anti-termite treatments. The type of soil, location, weather, material, and many other factors can determine your requirements and save you money.
Contact Samruddhi for all the right advice, and let us take care of all your construction worries.